
Get started with Dutch oven cooking for camping with our comprehensive guide. From finding the right size to mastering cooking techniques and understanding temperatures, we’ve got you covered. Plus, learn how to properly clean and maintain your Dutch oven. If you’re interested in Dutch oven cooking, this is your go-to resource!
Experience the unmatched versatility of a Dutch oven, the ultimate camp cookware. From braised Chicken Marbella to simmered vegetable stews and even baked apple pie, the possibilities are endless. If you’re ready to enhance your camp cooking game, a Dutch oven is a must-have addition to your outdoor culinary arsenal. When we received our first Dutch oven as a gift, we had no clue how to use it. However, it quickly became an indispensable tool for our camp cooking adventures. Now, we can’t imagine embarking on a camping trip without it.
Whether you’re a beginner looking to acquire a Dutch oven or an experienced enthusiast seeking to enhance your skills, this guide is your compass. Hearthcook will take you step-by-step through everything you need to know about How to Cook with a Dutch Oven while Camping?
What Is The Difference Between A Home Dutch Oven And A Camping Dutch Oven?
Home Dutch ovens, such as those from Le Creuset and Staub, feature enamel-sealed flat bottoms. They are intended for use in home kitchens, compatible with stovetops and ovens. However, they are not suitable for campfire cooking.
Camping Dutch ovens, like those from Lodge and Camp Chef, are exclusively crafted from cast iron. They boast support legs and a flat flanged lid. These ovens are designed for use with hot charcoal or wood embers from a campfire, making them ideal for outdoor cooking adventures.
Anatomy Of A Camping Dutch Oven
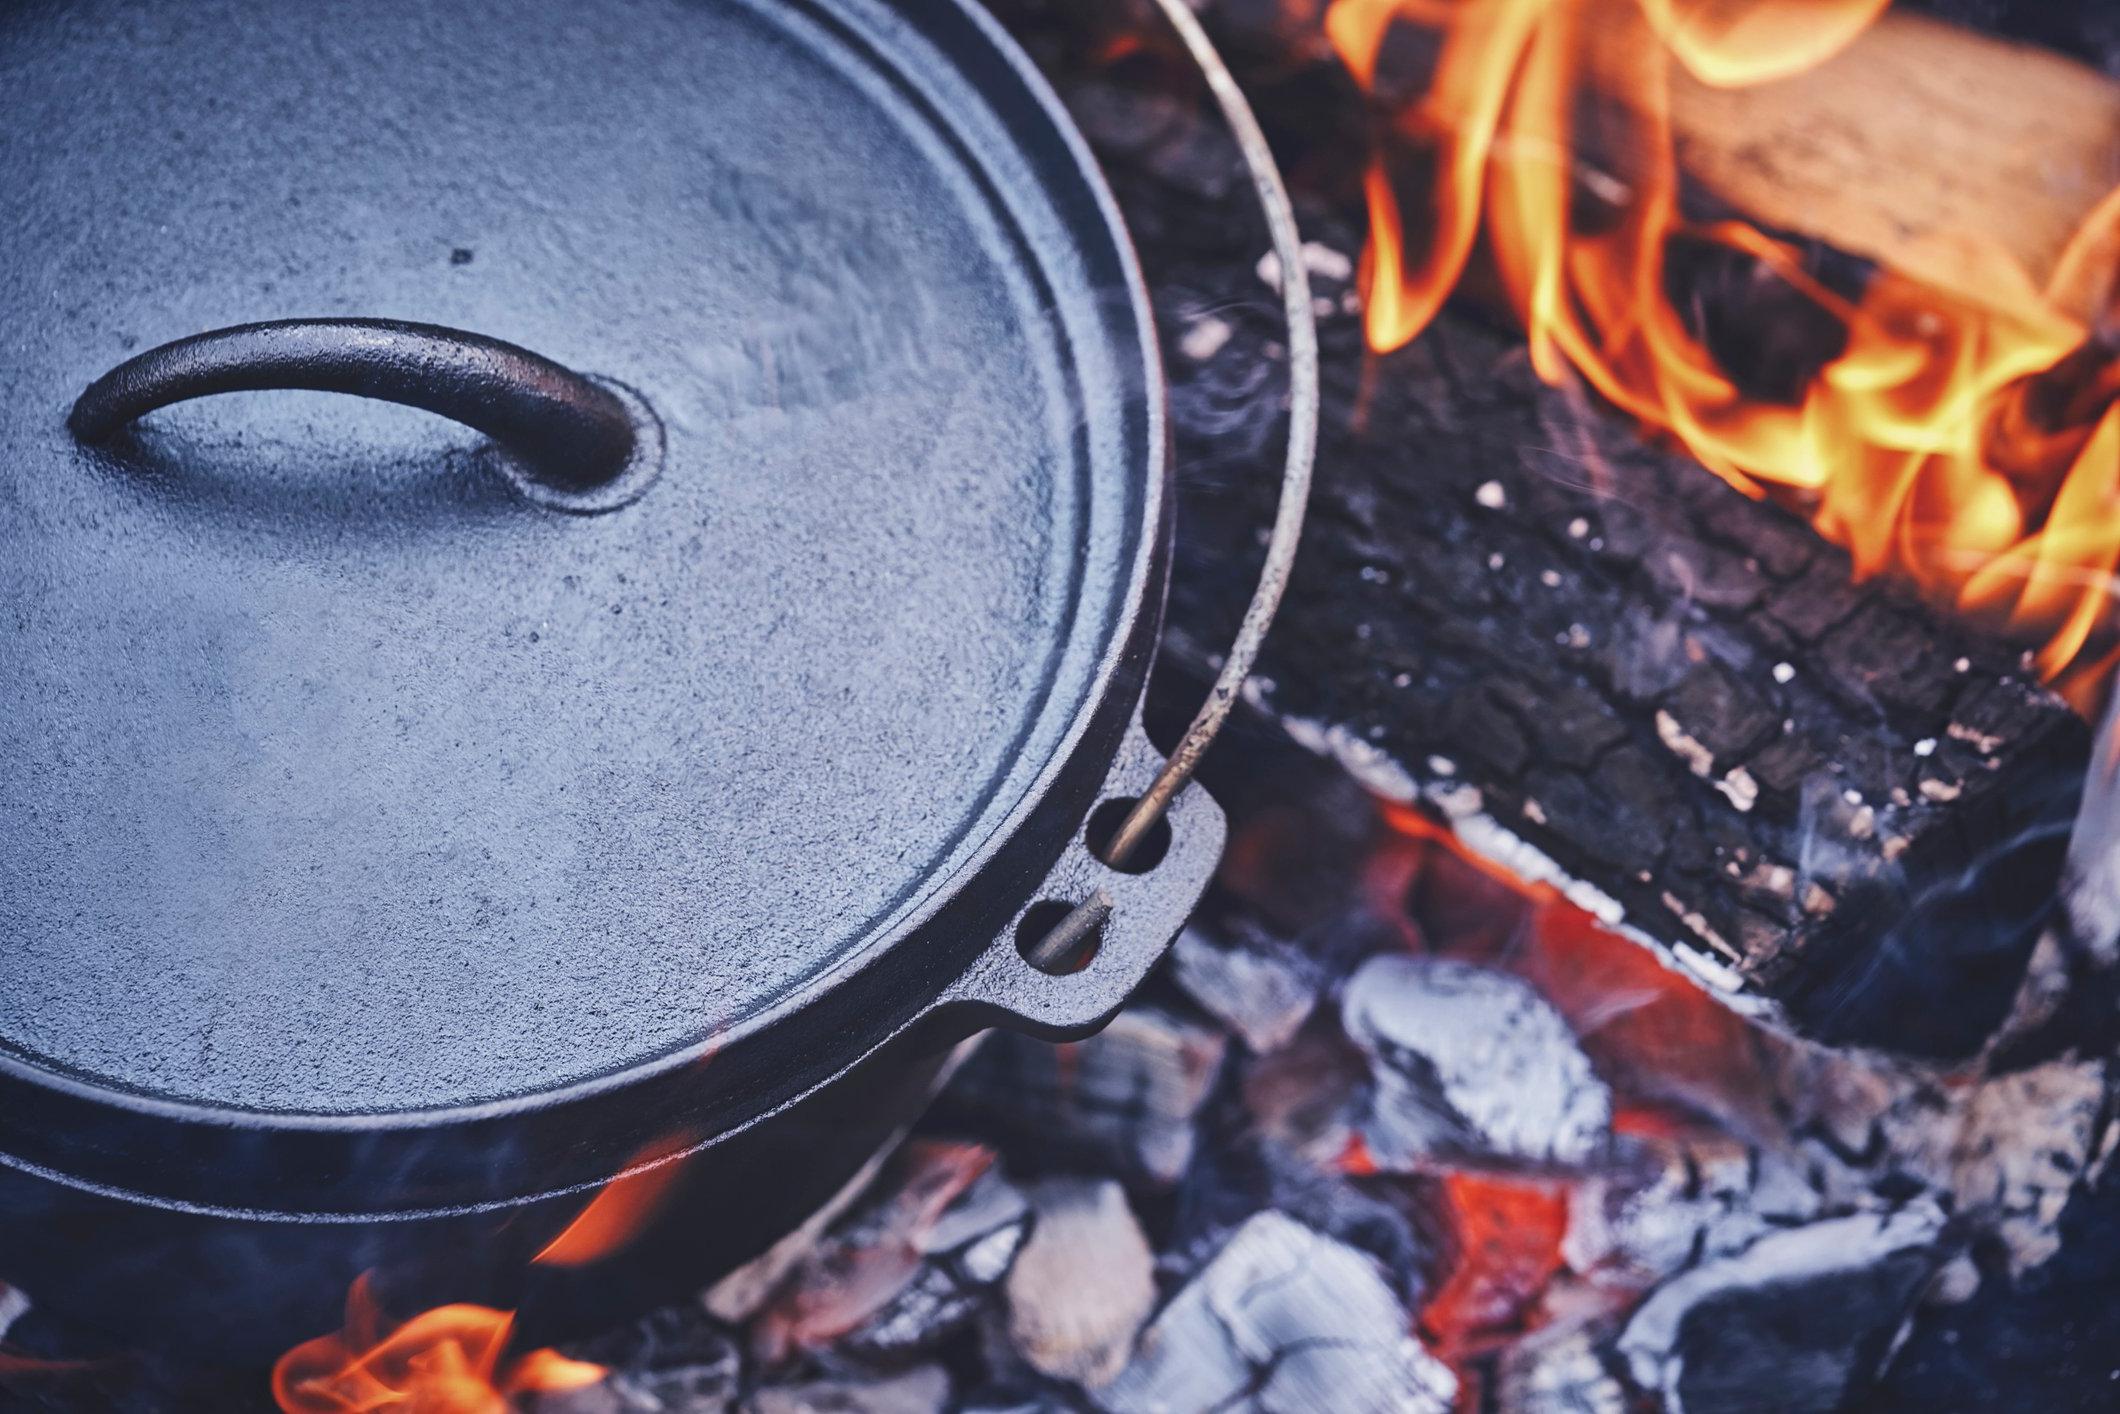
- Handle: A Dutch oven is equipped with an articulating metal bail handle, facilitating easy handling and movement. It can also be used to hang the oven from a tripod over an open fire.
- Lid: The lid is designed to be relatively flat with a raised rim, preventing charcoal from rolling off during cooking and avoiding accidental ash spills when removing the lid. Additionally, the lid can be inverted and utilized as a separate cooking surface, with some models featuring built-in legs for stability.
- Body: The body of the Dutch oven is crafted from cast iron, ensuring excellent heat retention and distribution for optimal cooking performance.
- Legs: The Dutch oven features small legs on the bottom, elevating it a few inches above the ground. This facilitates the placement of charcoals and embers underneath the oven for efficient heat management.
Dutch Oven Sizes
| Diameter | Capacity | Serving Size |
|---|---|---|
| 8 inch | 2 quarts | 2-3 people |
| 10 inch | 4 quarts | 2-6 people |
| 12 inch | 6 quarts | 6-10 people |
| 14 inch | 8 quarts | 8-16 people |
How To Cook With A Dutch Oven
A camping Dutch oven is not just a regular pot with a lid; it opens up a world of culinary possibilities. Here are some cooking methods you can enjoy with this versatile piece of cookware:
- Simmer, boil, steam: Like any pot, a Dutch oven is perfect for simmering soups, steaming rice, boiling water for pasta, and more. It excels at any cooking method you would typically perform in a regular pot.
- Sear, pan-fry, sauté: A camping Dutch oven can easily replace a cast-iron skillet. You can use it to sear steaks, brown chicken thighs, sauté vegetables, and more. The high sides of the Dutch oven help contain splattering grease.
- Baking: One of the standout advantages of a camping Dutch oven is its ability to function as an oven. By placing hot coals both on the lid and underneath the body, the interior of the Dutch oven is heated evenly. This allows you to bake delicious treats such as biscuits, scones, and pies.
- Braising: Similar to baking, braising requires dual-direction heating. The Dutch oven’s lid traps the small amount of liquid used for braising, creating a moist and flavorful cooking environment. It’s perfect for achieving tender and succulent results with a “low and slow” approach.
Unleash your culinary creativity and explore the diverse cooking methods made possible by a camping Dutch oven. From simmering and baking to searing and braising, it’s a versatile companion for your outdoor cooking adventures.
Dutch Oven Heating Methods
Camping Dutch ovens were specifically designed to utilize hot coals or wood embers for cooking. This unique form of dual-direction heating is essential for baking and braising with a Dutch oven.
There are various ways to use a Dutch oven for cooking:
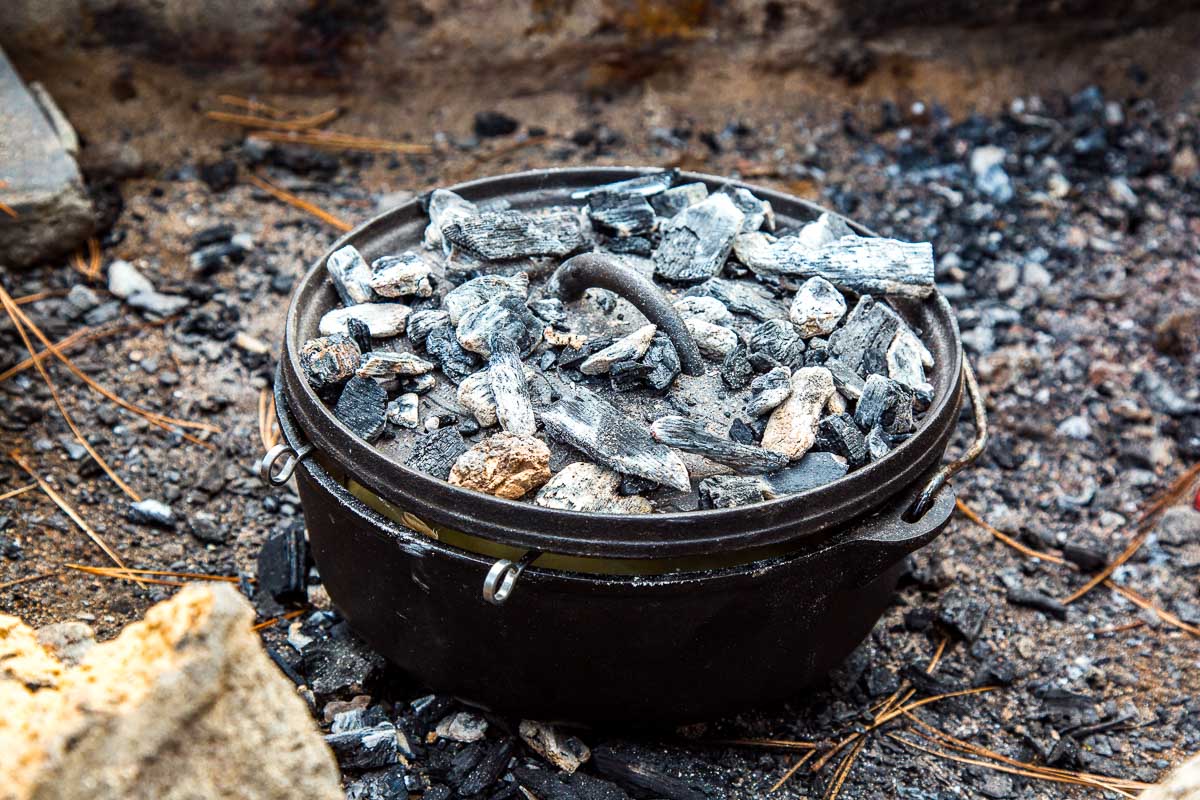
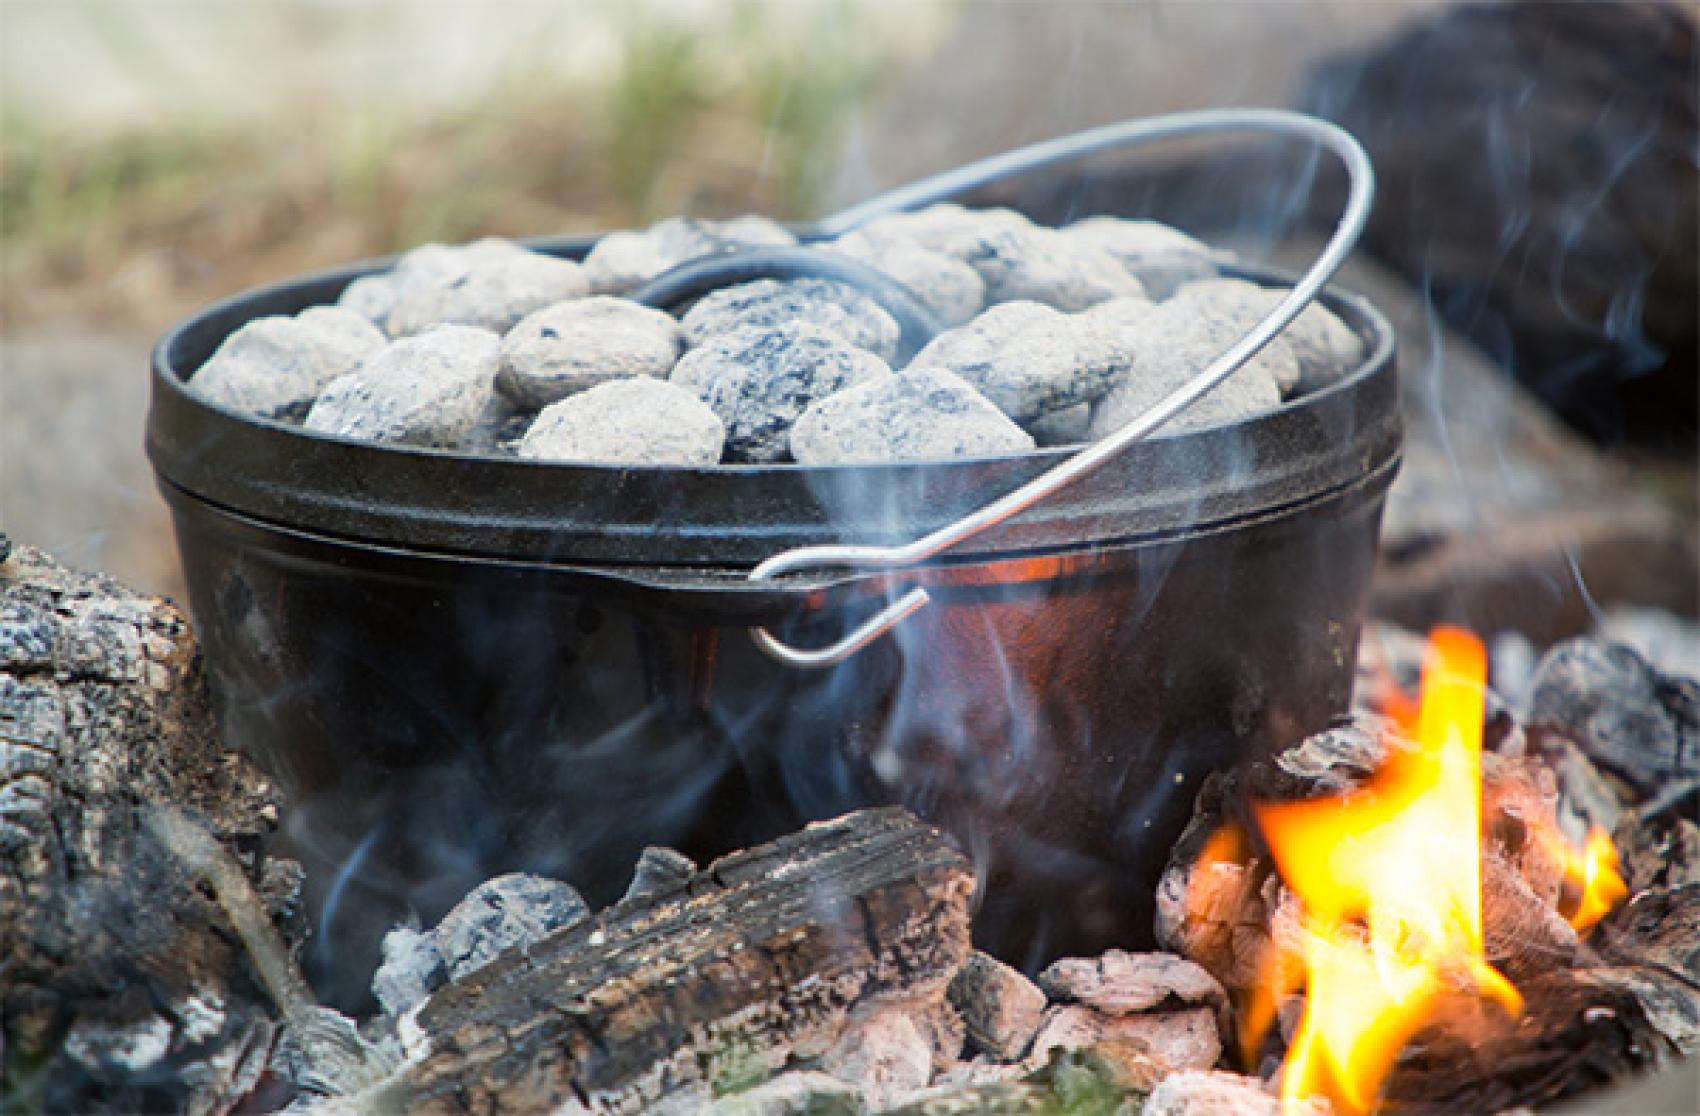
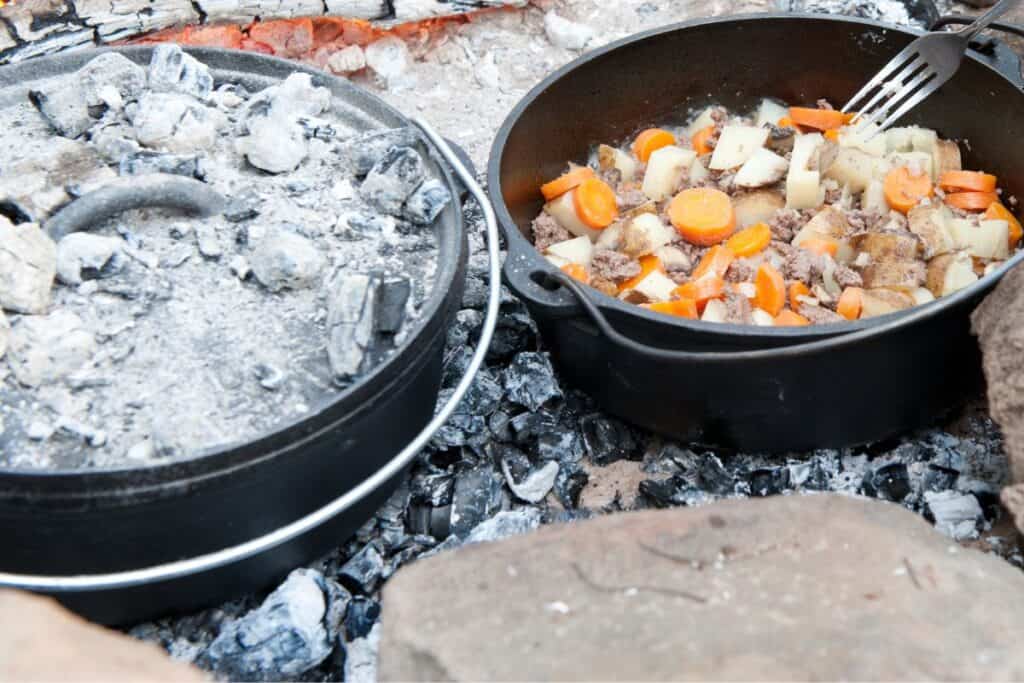
- Coals and Embers: The traditional method involves placing hot coals or wood embers both underneath the pot and on the lid. This allows for even heat distribution and enables baking and braising.
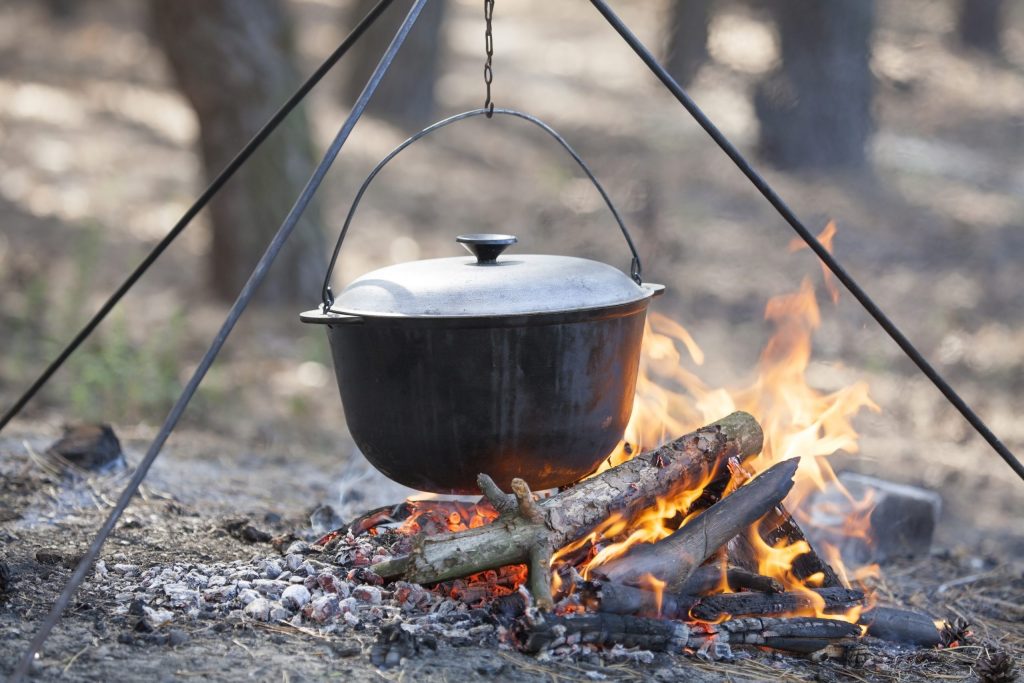
- Campfire Suspension: You can suspend the Dutch oven over a campfire using a tripod. This method provides a consistent heat source and is great for outdoor cooking.
- Campfire Cooking Grate: Another option is to place the Dutch oven on a campfire cooking grate directly over a fire. This allows for a controlled cooking environment and versatility in your outdoor cooking techniques.
- Camp Stove: Depending on the design of your camp stove, it may be possible to use a Dutch oven on top of it. Some Dutch ovens have legs that fit between the grates of a camp stove, enabling you to cook with the convenience of a stove. This can be especially useful in areas with seasonal fire bans.
By understanding and utilizing these heating methods, you can fully enjoy the versatility of a camping Dutch oven during your outdoor adventures. Whether you’re baking, braising, or cooking over a campfire, the Dutch oven is a reliable companion for delicious camp meals.
Charcoal Or Embers?
When it comes to baking or braising with a Dutch oven, it’s important to generate heat from both the top and the bottom. This can be accomplished by using either charcoal or wood embers as your heat source.
- Charcoal Briquettes: The uniform shape of charcoal briquettes makes it easier to evenly distribute heat. You can refer to a temperature chart (see below) to estimate the number of briquettes needed on the top and bottom to reach your desired temperature.
- Lump Hardwood Charcoal: Less processed than briquettes, lump charcoal has irregular shapes, which can make it more challenging to ensure equal heat distribution. Although lump charcoal ignites faster, it tends to burn out quicker than briquettes. You might need to add additional lump charcoal midway to maintain a consistent temperature.
- Wood Embers: Using embers from your campfire is another option for heating your Dutch oven. Keep in mind that the quality of the embers depends on the type of wood burned. Softwoods, such as pine commonly found in campgrounds, produce weaker embers that burn out quickly. Hardwoods like oak, almond, maple, or citrus yield longer-lasting embers.
- Our Preferred Choice: Given the choice, we prefer using briquettes for their reliability. However, we have successfully used all the options mentioned above.
Regardless of the heat source you choose, understanding how to effectively generate dual-direction heat will enhance your Dutch oven cooking experience. With proper heat distribution, you can create mouthwatering meals while enjoying the outdoors.
Determining Temperature
When it comes to baking in a Dutch oven, a common temperature to aim for is 350°F (175°C). Here’s a quick trick to determine the number of charcoal briquettes needed to reach this temperature: double the diameter of your Dutch oven and add one. For instance, a 10″ Dutch oven would require around 21 briquettes to achieve 350°F.
As for the coal distribution, a general ratio to follow is about ⅓ of the briquettes placed underneath and ⅔ on top. Applying this ratio to the previous example, you would place 7 briquettes underneath and 14 on top.
It’s important to note that while this is a useful guideline, it may not provide precise results due to factors like outdoor temperature, charcoal type, and food volume affecting the heat. For more accurate measurements, consider using an instant-read probe thermometer to monitor the internal temperature of your Dutch oven.
However, with practice and experience, you can develop a sense of temperature by gauging the heat radiating from the coals. It may take some time to master this technique, but you’ll gradually become more proficient. In the meantime, the provided chart can serve as a helpful starting point for your Dutch oven adventures.
Managing The Heat
Wind Shelter
When you’re cooking outdoors, one of the major obstacles you may face is the wind. Windy conditions can rapidly diminish the heat of your coals and shorten their burning time. Therefore, it’s advisable to take measures to protect your cooking setup from the wind as much as possible.
- Rock Wind Shelter: Constructing a small semi-circle rock shelter is a quick and effective way to create a wind barrier. This simple structure can help shield your cooking area from the wind and preserve the heat generated by your coals.
- Fire Ring: If you’re cooking at an established campground, utilizing the provided fire ring is the easiest and safest option. Not only does it offer a designated cooking area, but it also functions as a built-in wind shelter, providing some level of protection against gusts.
- Dutch Oven Table: For dedicated Dutch oven enthusiasts, specialized metal table tops with wind blockers are available. These tables not only safeguard your cooking setup from the wind but also allow you to work comfortably in a standing position, eliminating the need to hunch down on the ground.
By implementing these strategies, you can effectively mitigate the impact of windy conditions, ensuring that your outdoor cooking experience remains enjoyable and uninterrupted.
Rotating The Lid
Promoting Even Heat Distribution: Rotating the Dutch Oven
To achieve consistent and even heating of your food, it’s important to prevent hot spots. One effective technique is to rotate both the lid and body of the Dutch oven approximately every 15 minutes. Follow these steps for optimal results:
- Rotate the Body: Utilizing the handle of the Dutch oven, give the body a gentle quarter turn. This rotation helps redistribute the heat evenly throughout the pot, minimizing the risk of any specific areas becoming excessively hot.
- Rotate the Lid: With the aid of a lid-lifter or heat-resistant gloves, lift the lid slightly and rotate it a quarter turn in the opposite direction. This action ensures that the heat distribution is well-balanced, reducing the likelihood of uneven cooking or browning.
By incorporating this rotating technique, you can enhance the overall cooking performance of your Dutch oven, resulting in evenly cooked and delicious meals.
Stacking Multiple Dutch Ovens
When you find yourself with multiple Dutch ovens and a limited supply of coals, fear not! Stacking the Dutch ovens on top of each other can be a practical solution. This method allows you to utilize the top coals of the bottom Dutch oven as the bottom coals for the one above. Trust us, it may sound confusing, but it’s quite straightforward when you see it in action.
To ensure stability and proper heat distribution, it’s important to start with the Dutch oven that has the widest diameter as the base.
However, it’s worth noting that when you stack Dutch ovens, the traditional coal ratio chart may no longer apply. The number of coals needed on top for the bottom Dutch oven will not necessarily be the same as the number required on the bottom for the top Dutch oven. It can become a bit messy and challenging to calculate precisely.
While Dutch oven stacking can be an exciting experiment, be prepared to let go of the usual formulas. Embrace the fun and creativity of the process, and adjust the coal placement based on observation and experience.
Baking In A Dutch Oven
Baking in a Dutch oven is a true delight, but it comes with its own set of challenges. The sealed environment can trap steam, hindering browning and crust formation. Here are two handy techniques to overcome these hurdles:
- Steam release with metal skewers: Lay metal kabob skewers across the Dutch oven to create a small gap between the lid and body. This allows steam to escape while maintaining heat retention. Remember to occasionally lift the lid slightly to release excess steam.
- Parchment paper with lifting straps: Cut a circular piece of parchment paper and use folded parchment paper strips as lifting straps. These straps make it easier to remove pies and bread from the Dutch oven without any hassle.
Using A Dutch Oven Over A Campfire
When cooking with a Dutch oven at established campgrounds, you’ll find that most firepits come equipped with adjustable grill grates. These grates can be used to elevate your Dutch oven over the fire. Just ensure that the legs of the Dutch oven fit through the grate securely.
For dishes that require long simmers, such as chilis or stews, consider hanging your Dutch oven over an open fire using a tripod. By using a simple chain and S-hook, you can easily adjust the height of the Dutch oven, allowing you to fine-tune the heat to your liking.
Using A Dutch Oven On A Camp Stove
If you just want to use your Dutch oven as a pot, you will most likely be able to use it on any standard two-burner camp stove. Most camp stoves have an elevated grate, which will allow the legs of the Dutch oven to hang down.
How To Clean And Maintain A Dutch Oven?
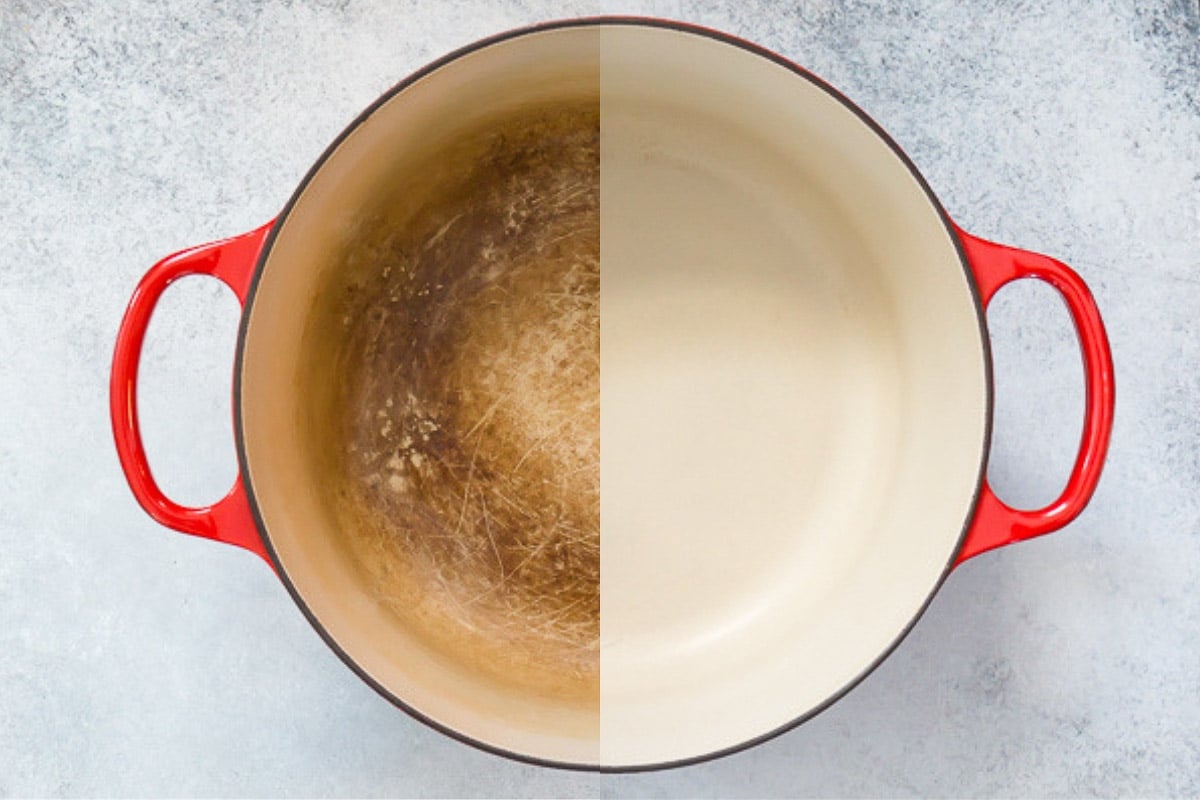
Cleaning a Dutch oven follows the same process as cleaning any other piece of cast iron cookware. Here’s the best technique we’ve discovered:
- Use a plastic scraper: Begin by using a plastic scraper and a little warm water. Gently scrape the interior of the Dutch oven, removing any stubborn food particles without risking damage to the seasoning. The plastic scraper ensures a thorough cleaning without scratching the surface.
- Rinse and dry: Once the interior is smooth and free of rough patches, rinse the Dutch oven with warm water. Make sure to dry it completely. For thorough drying, we recommend placing it over heat until it is completely dry.
- Apply a light coating of oil: Add a dime-sized drop of grapeseed oil to the interior of the Dutch oven. Using a paper towel, evenly spread the oil, ensuring the entire surface is coated. This step helps maintain the seasoning and protects the Dutch oven from rust.
How To Reseason A Dutch Oven?
If your Dutch oven is in bad condition or needs some TLC, a complete reseasoning is recommende.
- Clean thoroughly: Remove any existing seasoning or rust by scrubbing with steel wool and soap. Rinse and dry completely.
- Apply oil: Use a cloth to apply a thin, even layer of vegetable or flaxseed oil to the entire Dutch oven, inside and out.
- Bake: Place the Dutch oven upside down in a preheated oven at 350°F (175°C) for an hour to polymerize the oil and create a protective layer
- Repeat: Let it cool, then repeat steps 2 and 3 for additional layers of seasoning.
- Season with use: With each use and cooking with oils or fats, the seasoning will continue to improve.
By following these steps, you can restore your Dutch oven to its former glory and enjoy its reliable performance during your outdoor cooking adventures.
Useful Accessories
- Charcoal Chimney: Say goodbye to lighter fluid! A collapsible charcoal chimney is a convenient tool for quickly lighting your coals while camping. It’s compact and comes with a durable storage bag.
- Lid Lifter: Opt for a versatile 4-in-1 lid lifter from Lodge, which serves as a lid-lifter, bail hook, pot stand, and lid stand. It conveniently folds up and fits inside a 10” Dutch oven.
- Heat Resistant Gloves: Choose heat resistant grill gloves for superior protection during cooking. They outperform many welding mitts we’ve tried.
- Metal Tongs: When using charcoal briquettes, a pair of long metal tongs will help you handle and reposition them effortlessly.
- Shovel: If you prefer lump charcoal or campfire embers, a small metal shovel comes in handy for moving them around.
- Instant Read Thermometer: Gain precise temperature control by using an instant-read probe thermometer. It’s invaluable for monitoring the interior temperature of your Dutch oven or checking the doneness of meat.
- Metal Skewers: For effective steam release during baking, place a few metal skewers between the Dutch oven body and the lid. This creates a small gap to let out steam while retaining heat.
- Tripod: Invest in a tripod if you frequently camp in areas without campfire grates. It allows you to hang your Dutch oven over the fire and adjust the height for perfect low simmering.
- Pot Scraper: Cleaning cast iron is a breeze with a small plastic pot scraper, the best method we’ve found for this purpose.
- Liners or Parchment Paper: Simplify Dutch oven baking by using liners. Pre-cut liners are available, but we prefer making our own from parchment paper.